


Step 1: Creating Database Tables
It's always a good idea to start with creating a good data model when building an application. Let's describe our application in one sentence: We are going to make a forum which has users who create topics in various categories. Other users can post replies. As you can see, I highlighted a couple of nouns which represent our table names.Users
- Categories
- Topics
- Posts

I'll discuss each table by explaining the SQL, which I created using the scheme above. For your own scripts you can create a similar scheme and SQL too. Some editors like MySQL Workbench (the one I used) can generate .sql files too, but I would recommend learning SQL because it's more fun to do it yourself. A SQL introduction can be found at W3Schools.
Users Table
01
02
03
04
05
06
07
08
09
10
| CREATE TABLE users (user_id INT(8) NOT NULL AUTO_INCREMENT,user_name VARCHAR(30) NOT NULL,user_pass VARCHAR(255) NOT NULL,user_email VARCHAR(255) NOT NULL,user_date DATETIME NOT NULL,user_level INT(8) NOT NULL,UNIQUE INDEX user_name_unique (user_name),PRIMARY KEY (user_id)) TYPE=INNODB; |
user_id
"A primary key is used to uniquely identify each row in a table."The type of this field is INT, which means this field holds an integer. The field cannot be empty (NOT NULL) and increments which each record inserted. At the bottom of the table you can see the user_id field is declared as a primary key. A primary key is used to uniquely identify each row in a table. No two distinct rows in a table can have the same value (or combination of values) in all columns. That might be a bit unclear, so here's a little example.
There is a user called John Doe. If another users registers with the same name, there's a problem, because: which user is which? You can't tell and the database can't tell either. By using a primary key this problem is solved, because both topics are unique.
All the other tables have got primary keys too and they work the same way.
user_name
This is a text field, called a VARCHAR field in MySQL. The number between brackets is the maximum length. A user can choose a username up to 30 characters long. This field cannot be NULL. At the bottom of the table you can see this field is declared UNIQUE, which means the same username cannot be registered twice. The UNIQUE INDEX part tells the database we want to add a unique key. Then we define the name of the unique key, user_name_unique in this case. Between brackets is the field the unique key applies to, which is user_name.user_pass
This field is equal to the user_name field, except the maximum length. Since the user password, no matter what length, is hashed with sha1(), the password will always be 40 characters long.user_email
This field is equal to the user_pass field.user_date
This is a field in which we'll store the date the user registered. It's type is DATETIME and the field cannot be NULL.user_level
This field contains the level of the user, for example: '0' for a regular user and '1' for an admin. More about this later.Categories Table
1
2
3
4
5
6
7
| CREATE TABLE categories (cat_id INT(8) NOT NULL AUTO_INCREMENT,cat_name VARCHAR(255) NOT NULL,cat_description VARCHAR(255) NOT NULL,UNIQUE INDEX cat_name_unique (cat_name),PRIMARY KEY (cat_id)) TYPE=INNODB; |
Topics Table
1
2
3
4
5
6
7
8
| CREATE TABLE topics (topic_id INT(8) NOT NULL AUTO_INCREMENT,topic_subject VARCHAR(255) NOT NULL,topic_date DATETIME NOT NULL,topic_cat INT(8) NOT NULL,topic_by INT(8) NOT NULL,PRIMARY KEY (topic_id)) TYPE=INNODB; |
Posts Table
1
2
3
4
5
6
7
8
| CREATE TABLE posts (post_id INT(8) NOT NULL AUTO_INCREMENT,post_content TEXT NOT NULL,post_date DATETIME NOT NULL,post_topic INT(8) NOT NULL,post_by INT(8) NOT NULL,PRIMARY KEY (post_id)) TYPE=INNODB; |
"A foreign key is a referential constraint between two tables. The foreign key identifies a column or a set of columns in one (referencing) table that refers to a column or set of columns in another (referenced) table."Now that we've executed these queries, we have a pretty decent data model, but the relations are still missing. Let's start with the definition of a relationship. We're going to use something called a foreign key. A foreign key is a referential constraint between two tables. The foreign key identifies a column or a set of columns in one (referencing) table that refers to a column or set of columns in another (referenced) table. Some conditions:
- The column in the referencing table the foreign key refers to must be a primary key
- The values that are referred to must exist in the referenced table
We'll link the topics to the categories first:
1
| ALTER TABLE topics ADD FOREIGN KEY(topic_cat) REFERENCES categories(cat_id) ON DELETE CASCADE ON UPDATE CASCADE; |
Every topic is linked to a category now. Let's link the topics to the user who creates one.
1
| ALTER TABLE topics ADD FOREIGN KEY(topic_by) REFERENCES users(user_id) ON DELETE RESTRICT ON UPDATE CASCADE; |
Link the posts to the topics:
1
| ALTER TABLE posts ADD FOREIGN KEY(post_topic) REFERENCES topics(topic_id) ON DELETE CASCADE ON UPDATE CASCADE; |
1
| ALTER TABLE posts ADD FOREIGN KEY(post_by) REFERENCES users(user_id) ON DELETE RESTRICT ON UPDATE CASCADE; |
Step 2: Introduction to the Header/Footer System
Each page of our forum needs a few basic things, like a doctype and some markup. That's why we'll include a header.php file at the top of each page, and a footer.php at the bottom. The header.php contains a doctype, a link to the stylesheet and some important information about the forum, such as the title tag and metatags.header.php
01
02
03
04
05
06
07
08
09
10
11
12
13
14
15
16
17
18
19
20
21
22
| <!DOCTYPE html PUBLIC "-//W3C//DTD XHTML 1.0 Strict//EN"<head> <meta http-equiv="Content-Type" content="text/html; charset=UTF-8" /> <meta name="description" content="A short description." /> <meta name="keywords" content="put, keywords, here" /> <title>PHP-MySQL forum</title> <link rel="stylesheet" href="style.css" type="text/css"></head><body><h1>My forum</h1> <div id="wrapper"> <div id="menu"> <a class="item" href="/forum/index.php">Home</a> - <a class="item" href="/forum/create_topic.php">Create a topic</a> - <a class="item" href="/forum/create_cat.php">Create a category</a> <div id="userbar"> <div id="userbar">Hello Example. Not you? Log out.</div> </div> <div id="content"> |
The attentive reader might have already noticed we're missing some things. There is no
</body> or </html> tag. They're in the footer.php page, as you can see below.
1
2
3
4
5
| </div><!-- content --></div><!-- wrapper --><div id="footer">Created for Nettuts+</div></body></html> |
01
02
03
04
05
06
07
08
09
10
11
12
| <?php$error = false;if($error = false){ //the beautifully styled content, everything looks good echo '<div id="content">some text</div>';}else{ //bad looking, unstyled error :-( } ?> |
Another advantage is the possibility of making quick changes. You can see for yourself by editing the text in footer.php when you've finished this tutorial; you'll notice that the footer changes on every page immediately. Finally, we add a stylesheet which provides us with some basic markup - nothing too fancy.
001
002
003
004
005
006
007
008
009
010
011
012
013
014
015
016
017
018
019
020
021
022
023
024
025
026
027
028
029
030
031
032
033
034
035
036
037
038
039
040
041
042
043
044
045
046
047
048
049
050
051
052
053
054
055
056
057
058
059
060
061
062
063
064
065
066
067
068
069
070
071
072
073
074
075
076
077
078
079
080
081
082
083
084
085
086
087
088
089
090
091
092
093
094
095
096
097
098
099
100
101
102
103
104
105
106
107
108
109
110
111
112
113
114
115
116
117
118
119
| body { background-color: #4E4E4E; text-align: center; /* make sure IE centers the page too */}#wrapper { width: 900px; margin: 0 auto; /* center the page */}#content { background-color: #fff; border: 1px solid #000; float: left; font-family: Arial; padding: 20px 30px; text-align: left; width: 100%; /* fill up the entire div */}#menu { float: left; border: 1px solid #000; border-bottom: none; /* avoid a double border */ clear: both; /* clear:both makes sure the content div doesn't float next to this one but stays under it */ width:100%; height:20px; padding: 0 30px; background-color: #FFF; text-align: left; font-size: 85%;}#menu a:hover { background-color: #009FC1;}#userbar { background-color: #fff; float: right; width: 250px;}#footer { clear: both;}/* begin table styles */table { border-collapse: collapse; width: 100%;}table a { color: #000;}table a:hover { color:#373737; text-decoration: none;}th { background-color: #B40E1F; color: #F0F0F0;}td { padding: 5px;}/* Begin font styles */h1, #footer { font-family: Arial; color: #F1F3F1;}h3 {margin: 0; padding: 0;}/* Menu styles */.item { background-color: #00728B; border: 1px solid #032472; color: #FFF; font-family: Arial; padding: 3px; text-decoration: none;}.leftpart { width: 70%;}.rightpart { width: 30%;}.small { font-size: 75%; color: #373737;}#footer { font-size: 65%; padding: 3px 0 0 0;}.topic-post { height: 100px; overflow: auto;}.post-content { padding: 30px;}textarea { width: 500px; height: 200px;} |
Step 3: Getting Ready for Action
Before we can read anything from our database, we need a connection. That's what connect.php is for. We'll include it in every file we are going to create.
01
02
03
04
05
06
07
08
09
10
11
12
13
14
15
16
| <?php//connect.php$server = 'localhost';$username = 'usernamehere';$password = 'passwordhere';$database = 'databasenamehere';if(!mysql_connect($server, $username, $password)){ exit('Error: could not establish database connection');}if(!mysql_select_db($database){ exit('Error: could not select the database');}?> |
Step 4: Displaying the Forum Overview
Since we're just started with some basic techniques, we're going to make a simplified version of the forum overview for now.
01
02
03
04
05
06
07
08
09
10
11
12
13
14
15
| <?php//create_cat.phpinclude 'connect.php';include 'header.php'; echo '<tr>'; echo '<td class="leftpart">'; echo '<h3><a href="category.php?id=">Category name</a></h3> Category description goes here'; echo '</td>'; echo '<td class="rightpart">'; echo '<a href="topic.php?id=">Topic subject</a> at 10-10'; echo '</td>';echo '</tr>';include 'footer.php';?> |
Step 5: Signing up a User
Let's start by making a simple HTML form so that a new user can register.
01
02
03
04
05
06
07
08
09
10
11
12
13
14
15
16
17
18
19
20
21
22
23
24
25
26
27
28
29
30
31
32
33
34
35
36
37
38
39
40
41
42
43
44
45
46
47
48
49
50
51
52
53
54
55
56
57
58
59
60
61
62
63
64
65
66
67
68
69
70
71
72
73
74
75
76
77
78
79
80
81
82
83
84
85
86
87
88
89
90
91
92
93
94
95
96
97
| <?php//signup.phpinclude 'connect.php';include 'header.php';echo '<h3>Sign up</h3>';if($_SERVER['REQUEST_METHOD'] != 'POST'){ /*the form hasn't been posted yet, display it note that the action="" will cause the form to post to the same page it is on */ echo '<form method="post" action=""> Username: <input type="text" name="user_name" /> Password: <input type="password" name="user_pass"> Password again: <input type="password" name="user_pass_check"> E-mail: <input type="email" name="user_email"> <input type="submit" value="Add category" /> </form>';}else{ /* so, the form has been posted, we'll process the data in three steps: 1. Check the data 2. Let the user refill the wrong fields (if necessary) 3. Save the data */ $errors = array(); /* declare the array for later use */ if(isset($_POST['user_name'])) { //the user name exists if(!ctype_alnum($_POST['user_name'])) { $errors[] = 'The username can only contain letters and digits.'; } if(strlen($_POST['user_name']) > 30) { $errors[] = 'The username cannot be longer than 30 characters.'; } } else { $errors[] = 'The username field must not be empty.'; } if(isset($_POST['user_pass'])) { if($_POST['user_pass'] != $_POST['user_pass_check']) { $errors[] = 'The two passwords did not match.'; } } else { $errors[] = 'The password field cannot be empty.'; } if(!empty($errors)) /*check for an empty array, if there are errors, they're in this array (note the ! operator)*/ { echo 'Uh-oh.. a couple of fields are not filled in correctly..'; echo '<ul>'; foreach($errors as $key => $value) /* walk through the array so all the errors get displayed */ { echo '<li>' . $value . '</li>'; /* this generates a nice error list */ } echo '</ul>'; } else { //the form has been posted without, so save it //notice the use of mysql_real_escape_string, keep everything safe! //also notice the sha1 function which hashes the password $sql = "INSERT INTO users(user_name, user_pass, user_email ,user_date, user_level) VALUES('" . mysql_real_escape_string($_POST['user_name']) . "', '" . sha1($_POST['user_pass']) . "', '" . mysql_real_escape_string($_POST['user_email']) . "', NOW(), 0)"; $result = mysql_query($sql); if(!$result) { //something went wrong, display the error echo 'Something went wrong while registering. Please try again later.'; //echo mysql_error(); //debugging purposes, uncomment when needed } else { echo 'Successfully registered. You can now <a href="signin.php">sign in</a> and start posting! :-)'; } }}include 'footer.php';?> |
- Validating the data
- If the data is not valid, show the form again
- If the data is valid, save the record in the database
1
2
3
4
5
6
7
| INSERT INTO users(user_name, user_pass, user_email ,user_date, user_level)VALUES('" . mysql_real_escape_string($_POST['user_name']) . "', '" . sha1($_POST['user_pass']) . "', '" . mysql_real_escape_string($_POST['user_email']) . "', NOW(), 0); |
"Never insert a plain password as-is. You MUST always encrypt it."Also, you can see that the function sha1() is used to encrypt the user's password. This is also a very important thing to remember. Never insert a plain password as-is. You MUST always encrypt it. Imagine a hacker who somehow manages to get access to your database. If he sees all the plain-text passwords he could log into any (admin) account he wants. If the password columns contain sha1 strings he has to crack them first which is almost impossible.
Note: it's also possible to use md5(), I always use sha1() because benchmarks have proved it's a tiny bit faster, not much though. You can replace sha1 with md5 if you like.
If the signup process was successful, you should see something like this:

Step 6: Adding Authentication and User Levels
An important aspect of a forum is the difference between regular users and admins/moderators. Since this is a small forum and adding features like adding new moderators and stuff would take way too much time, we'll focus on the login process and create some admin features like creating new categories and closing a thread.Now that you've completed the previous step, we're going to make your freshly created account an admin account. In phpMyAdmin, click on the users table, and then 'Browse'. Your account will probably pop up right away. Click the edit icon and change the value of the user_level field from 0 to 1. That's it for now. You won't notice any difference in our application immediately, but when we've added the admin features a normal account and your account will have different capabilities.
The sign-in process works the following way:
- A visitor enters user data and submits the form
- If the username and password are correct, we can start a session
- If the username and password are incorrect, we show the form again with a message

001
002
003
004
005
006
007
008
009
010
011
012
013
014
015
016
017
018
019
020
021
022
023
024
025
026
027
028
029
030
031
032
033
034
035
036
037
038
039
040
041
042
043
044
045
046
047
048
049
050
051
052
053
054
055
056
057
058
059
060
061
062
063
064
065
066
067
068
069
070
071
072
073
074
075
076
077
078
079
080
081
082
083
084
085
086
087
088
089
090
091
092
093
094
095
096
097
098
099
100
101
102
103
104
105
106
107
| <?php//signin.phpinclude 'connect.php';include 'header.php';echo '<h3>Sign in</h3>';//first, check if the user is already signed in. If that is the case, there is no need to display this pageif(isset($_SESSION['signed_in']) && $_SESSION['signed_in'] == true){ echo 'You are already signed in, you can <a href="signout.php">sign out</a> if you want.';}else{ if($_SERVER['REQUEST_METHOD'] != 'POST') { /*the form hasn't been posted yet, display it note that the action="" will cause the form to post to the same page it is on */ echo '<form method="post" action=""> Username: <input type="text" name="user_name" /> Password: <input type="password" name="user_pass"> <input type="submit" value="Sign in" /> </form>'; } else { /* so, the form has been posted, we'll process the data in three steps: 1. Check the data 2. Let the user refill the wrong fields (if necessary) 3. Varify if the data is correct and return the correct response */ $errors = array(); /* declare the array for later use */ if(!isset($_POST['user_name'])) { $errors[] = 'The username field must not be empty.'; } if(!isset($_POST['user_pass'])) { $errors[] = 'The password field must not be empty.'; } if(!empty($errors)) /*check for an empty array, if there are errors, they're in this array (note the ! operator)*/ { echo 'Uh-oh.. a couple of fields are not filled in correctly..'; echo '<ul>'; foreach($errors as $key => $value) /* walk through the array so all the errors get displayed */ { echo '<li>' . $value . '</li>'; /* this generates a nice error list */ } echo '</ul>'; } else { //the form has been posted without errors, so save it //notice the use of mysql_real_escape_string, keep everything safe! //also notice the sha1 function which hashes the password $sql = "SELECT user_id, user_name, user_level FROM users WHERE user_name = '" . mysql_real_escape_string($_POST['user_name']) . "' AND user_pass = '" . sha1($_POST['user_pass']) . "'"; $result = mysql_query($sql); if(!$result) { //something went wrong, display the error echo 'Something went wrong while signing in. Please try again later.'; //echo mysql_error(); //debugging purposes, uncomment when needed } else { //the query was successfully executed, there are 2 possibilities //1. the query returned data, the user can be signed in //2. the query returned an empty result set, the credentials were wrong if(mysql_num_rows($result) == 0) { echo 'You have supplied a wrong user/password combination. Please try again.'; } else { //set the $_SESSION['signed_in'] variable to TRUE $_SESSION['signed_in'] = true; //we also put the user_id and user_name values in the $_SESSION, so we can use it at various pages while($row = mysql_fetch_assoc($result)) { $_SESSION['user_id'] = $row['user_id']; $_SESSION['user_name'] = $row['user_name']; $_SESSION['user_level'] = $row['user_level']; } echo 'Welcome, ' . $_SESSION['user_name'] . '. <a href="index.php">Proceed to the forum overview</a>.'; } } } }}include 'footer.php';?> |
01
02
03
04
05
06
07
08
09
10
| SELECT user_id, user_name, user_levelFROM usersWHERE user_name = '" . mysql_real_escape_string($_POST['user_name']) . "'AND user_pass = '" . sha1($_POST['user_pass']) |
If the user is signed in successfully, we're doing a few things:
01
02
03
04
05
06
07
08
09
10
| <?php//set the $_SESSION['signed_in'] variable to TRUE$_SESSION['signed_in'] = true; //we also put the user_id and user_name values in the $_SESSION, so we can use it at various pageswhile($row = mysql_fetch_assoc($result)){ $_SESSION['user_id'] = $row['user_id']; $_SESSION['user_name'] = $row['user_name']; }?> |
Of course signing in requires another function, signing out! The sign-out process is actually a lot easier than the sign-in process. Because all the information about the user is stored in $_SESSION variables, all we have to do is unset them and display a message.
Now that we've set the $_SESSION variables, we can determine if someone is signed in. Let's make a last simple change to header.php:
Replace:
1
| <div id="userbar">Hello Example. Not you? Log out.</div> |
01
02
03
04
05
06
07
08
09
10
11
| <?php<div id="userbar"> if($_SESSION['signed_in']) { echo 'Hello' . $_SESSION['user_name'] . '. Not you? <a href="signout.php">Sign out</a>'; } else { echo '<a href="signin.php">Sign in</a> or <a href="sign up">create an account</a>.'; }</div> |
Step 7: Creating a Category
We want to create categories so let's start with making a form.
1
2
3
4
5
| <form method="post" action=""> Category name: <input type="text" name="cat_name" /> Category description: <textarea name="cat_description" /></textarea> <input type="submit" value="Add category" /> </form> |
01
02
03
04
05
06
07
08
09
10
11
12
13
14
15
16
17
18
19
20
21
22
23
24
25
26
27
28
29
30
31
| <?php//create_cat.phpinclude 'connect.php';if($_SERVER['REQUEST_METHOD'] != 'POST'){ //the form hasn't been posted yet, display it echo '<form method='post' action=''> Category name: <input type='text' name='cat_name' /> Category description: <textarea name='cat_description' /></textarea> <input type='submit' value='Add category' /> </form>';}else{ //the form has been posted, so save it $sql = ìINSERT INTO categories(cat_name, cat_description) VALUES('' . mysql_real_escape_string($_POST['cat_name']) . ì', '' . mysql_real_escape_string($_POST['cat_description']) . ì')'; $result = mysql_query($sql); if(!$result) { //something went wrong, display the error echo 'Error' . mysql_error(); } else { echo 'New category successfully added.'; }}?> |

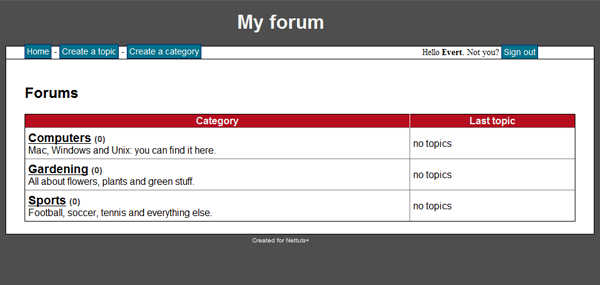
Step 8: Adding Categories to index.php
We've created some categories, so now we're able to display them on the front page. Let's add the following query to the content area of index.php.
1
2
3
4
5
6
| SELECT categories.cat_id, categories.cat_name, categories.cat_description,FROM categories |
01
02
03
04
05
06
07
08
09
10
11
12
13
14
15
16
17
18
19
20
21
22
23
24
25
26
27
28
29
30
31
32
33
34
35
36
37
38
39
40
41
42
43
44
45
46
47
48
49
| <?php//create_cat.phpinclude 'connect.php';include 'header.php';$sql = "SELECT cat_id, cat_name, cat_description, FROM categories";$result = mysql_query($sql);if(!$result){ echo 'The categories could not be displayed, please try again later.';}else{ if(mysql_num_rows($result) == 0) { echo 'No categories defined yet.'; } else { //prepare the table echo '<table border="1"> <tr> <th>Category</th> <th>Last topic</th> </tr>'; while($row = mysql_fetch_assoc($result)) { echo '<tr>'; echo '<td class="leftpart">'; echo '<h3><a href="category.php?id">' . $row['cat_name'] . '</a></h3>' . $row['cat_description']; echo '</td>'; echo '<td class="rightpart">'; echo '<a href="topic.php?id=">Topic subject</a> at 10-10'; echo '</td>'; echo '</tr>'; } }}include 'footer.php';?> |
1
| category.php?cat_id=23 |
Step 9: Creating a Topic
In this step, we're combining the techniques we learned in the previous steps. We're checking if a user is signed in, we'll use an input query to create the topic and create some basic HTML forms.The structure of create_topic.php can hardly be explained in a list or something, so I rewrote it in pseudo-code.
01
02
03
04
05
06
07
08
09
10
11
12
13
14
15
16
17
18
| <?phpif(user is signed in){ //the user is not signed in}else{ //the user is signed in if(form has not been posted) { //show form } else { //process form }}?> |
001
002
003
004
005
006
007
008
009
010
011
012
013
014
015
016
017
018
019
020
021
022
023
024
025
026
027
028
029
030
031
032
033
034
035
036
037
038
039
040
041
042
043
044
045
046
047
048
049
050
051
052
053
054
055
056
057
058
059
060
061
062
063
064
065
066
067
068
069
070
071
072
073
074
075
076
077
078
079
080
081
082
083
084
085
086
087
088
089
090
091
092
093
094
095
096
097
098
099
100
101
102
103
104
105
106
107
108
109
110
111
112
113
114
115
116
117
118
119
120
121
122
123
124
125
126
127
128
129
130
131
132
133
134
135
136
137
138
139
140
141
142
| <?php//create_cat.phpinclude 'connect.php';include 'header.php';echo '<h2>Create a topic</h2>';if($_SESSION['signed_in'] == false){ //the user is not signed in echo 'Sorry, you have to be <a href="/forum/signin.php">signed in</a> to create a topic.';}else{ //the user is signed in if($_SERVER['REQUEST_METHOD'] != 'POST') { //the form hasn't been posted yet, display it //retrieve the categories from the database for use in the dropdown $sql = "SELECT cat_id, cat_name, cat_description FROM categories"; $result = mysql_query($sql); if(!$result) { //the query failed, uh-oh :-( echo 'Error while selecting from database. Please try again later.'; } else { if(mysql_num_rows($result) == 0) { //there are no categories, so a topic can't be posted if($_SESSION['user_level'] == 1) { echo 'You have not created categories yet.'; } else { echo 'Before you can post a topic, you must wait for an admin to create some categories.'; } } else { echo '<form method="post" action=""> Subject: <input type="text" name="topic_subject" /> Category:'; echo '<select name="topic_cat">'; while($row = mysql_fetch_assoc($result)) { echo '<option value="' . $row['cat_id'] . '">' . $row['cat_name'] . '</option>'; } echo '</select>'; echo 'Message: <textarea name="post_content" /></textarea> <input type="submit" value="Create topic" /> </form>'; } } } else { //start the transaction $query = "BEGIN WORK;"; $result = mysql_query($query); if(!$result) { //Damn! the query failed, quit echo 'An error occured while creating your topic. Please try again later.'; } else { //the form has been posted, so save it //insert the topic into the topics table first, then we'll save the post into the posts table $sql = "INSERT INTO topics(topic_subject, topic_date, topic_cat, topic_by) VALUES('" . mysql_real_escape_string($_POST['topic_subject']) . "', NOW(), " . mysql_real_escape_string($_POST['topic_cat']) . ", " . $_SESSION['user_id'] . " )"; $result = mysql_query($sql); if(!$result) { //something went wrong, display the error echo 'An error occured while inserting your data. Please try again later.' . mysql_error(); $sql = "ROLLBACK;"; $result = mysql_query($sql); } else { //the first query worked, now start the second, posts query //retrieve the id of the freshly created topic for usage in the posts query $topicid = mysql_insert_id(); $sql = "INSERT INTO posts(post_content, post_date, post_topic, post_by) VALUES ('" . mysql_real_escape_string($_POST['post_content']) . "', NOW(), " . $topicid . ", " . $_SESSION['user_id'] . " )"; $result = mysql_query($sql); if(!$result) { //something went wrong, display the error echo 'An error occured while inserting your post. Please try again later.' . mysql_error(); $sql = "ROLLBACK;"; $result = mysql_query($sql); } else { $sql = "COMMIT;"; $result = mysql_query($sql); //after a lot of work, the query succeeded! echo 'You have successfully created <a href="topic.php?id='. $topicid . '">your new topic</a>.'; } } } }}include 'footer.php';?> |
Showing the form
We're starting with a simple HTML form. There is actually something special here, because we use a dropdown. This dropdown is filled with data from the database, using this query:
1
2
3
4
5
6
| SELECT cat_id, cat_name, cat_descriptionFROM categories |
Processing the form
The process of saving the topic consists of two parts: saving the topic in the topics table and saving the first post in the posts table. This requires something quite advanced that goes a bit beyond the scope of this tutorial. It's called a transaction, which basically means that we start by executing the start command and then rollback when there are database errors and commit when everything went well. More about transactions.
01
02
03
04
05
06
07
08
09
10
11
| <?php//start the transaction$query = "BEGIN WORK;";$result = mysql_query($query);//stop the transaction$sql = "ROLLBACK;";$result = mysql_query($sql);//commit the transaction$sql = "COMMIT;";$result = mysql_query($sql);?> |
1
2
3
4
5
6
7
8
9
| INSERT INTO topics(topic_subject, topic_date, topic_cat, topic_by)VALUES('" . mysql_real_escape_string($_POST['topic_subject']) . "', NOW(), " . mysql_real_escape_string($_POST['topic_cat']) . ", " . $_SESSION['user_id'] . ") |
If the query executed without errors we proceed to the second query. Remember we are still doing a transaction here. If we would've got errors we would have used the ROLLBACK command.
01
02
03
04
05
06
07
08
09
10
| INSERT INTO posts(post_content, post_date, post_topic, post_by)VALUES ('" . mysql_real_escape_string($_POST['post_content']) . "', NOW(), " . $topicid . ", " . $_SESSION['user_id'] . ") |
Then the post is inserted into the posts table. This query looks a lot like the topics query. The only difference is that this post refers to the topic and the topic referred to a category. From the start, we decided to create a good data model and here is the result: a nice hierarchical structure.

Step 10: Category View
We're going to make an overview page for a single category. We've just created a category, it would be handy to be able to view all the topics in it. First, create a page called category.php.A short list of the things we need:
Needed for displaying the category
- cat_name
- cat_description
- topic_id
- topic_subject
- topic_date
- topic_cat
1
2
3
4
5
6
7
8
| SELECT cat_id, cat_name, cat_descriptionFROM categoriesWHERE cat_id = " . mysql_real_escape_string($_GET['id']) |
1
2
3
4
5
6
7
8
9
| SELECT topic_id, topic_subject, topic_date, topic_catFROM topicsWHERE topic_cat = " . mysql_real_escape_string($_GET['id']) |
The complete code of category.php will be the following:
01
02
03
04
05
06
07
08
09
10
11
12
13
14
15
16
17
18
19
20
21
22
23
24
25
26
27
28
29
30
31
32
33
34
35
36
37
38
39
40
41
42
43
44
45
46
47
48
49
50
51
52
53
54
55
56
57
58
59
60
61
62
63
64
65
66
67
68
69
70
71
72
73
74
75
76
77
78
79
80
81
82
83
84
85
| <?php//create_cat.phpinclude 'connect.php';include 'header.php';//first select the category based on $_GET['cat_id']$sql = "SELECT cat_id, cat_name, cat_description FROM categories WHERE cat_id = " . mysql_real_escape_string($_GET['id']);$result = mysql_query($sql);if(!$result){ echo 'The category could not be displayed, please try again later.' . mysql_error();}else{ if(mysql_num_rows($result) == 0) { echo 'This category does not exist.'; } else { //display category data while($row = mysql_fetch_assoc($result)) { echo '<h2>Topics in ′' . $row['cat_name'] . '′ category</h2>'; } //do a query for the topics $sql = "SELECT topic_id, topic_subject, topic_date, topic_cat FROM topics WHERE topic_cat = " . mysql_real_escape_string($_GET['id']); $result = mysql_query($sql); if(!$result) { echo 'The topics could not be displayed, please try again later.'; } else { if(mysql_num_rows($result) == 0) { echo 'There are no topics in this category yet.'; } else { //prepare the table echo '<table border="1"> <tr> <th>Topic</th> <th>Created at</th> </tr>'; while($row = mysql_fetch_assoc($result)) { echo '<tr>'; echo '<td class="leftpart">'; echo '<h3><a href="topic.php?id=' . $row['topic_id'] . '">' . $row['topic_subject'] . '</a><h3>'; echo '</td>'; echo '<td class="rightpart">'; echo date('d-m-Y', strtotime($row['topic_date'])); echo '</td>'; echo '</tr>'; } } } }}include 'footer.php';?> |

Step 11: Topic View
The SQL queries in this step are complicated ones. The PHP-part is all stuff that you've seen before. Let's take a look at the queries. The first one retrieves basic information about the topic:
1
2
3
4
5
6
7
| SELECT topic_id, topic_subjectFROM topicsWHERE topics.topic_id = " . mysql_real_escape_string($_GET['id']) |
01
02
03
04
05
06
07
08
09
10
11
12
13
14
15
| SELECT posts.post_topic, posts.post_content, posts.post_date, posts.post_by, users.user_id, users.user_nameFROM postsLEFT JOIN usersON posts.post_by = users.user_idWHERE posts.post_topic = " . mysql_real_escape_string($_GET['id']) |
The final topic view looks like this:

Step 12: Adding a Reply
Let's create the last missing part of this forum, the possibility to add a reply. We'll start by creating a form:
1
2
3
4
| <form method="post" action="reply.php?id=5"> <textarea name="reply-content"></textarea> <input type="submit" value="Submit reply" /></form> |

01
02
03
04
05
06
07
08
09
10
11
12
13
14
15
16
17
18
19
20
21
22
23
24
25
26
27
28
29
30
31
32
33
34
35
36
37
38
39
40
41
42
43
44
45
| <?php//create_cat.phpinclude 'connect.php';include 'header.php';if($_SERVER['REQUEST_METHOD'] != 'POST'){ //someone is calling the file directly, which we don't want echo 'This file cannot be called directly.';}else{ //check for sign in status if(!$_SESSION['signed_in']) { echo 'You must be signed in to post a reply.'; } else { //a real user posted a real reply $sql = "INSERT INTO posts(post_content, post_date, post_topic, post_by) VALUES ('" . $_POST['reply-content'] . "', NOW(), " . mysql_real_escape_string($_GET['id']) . ", " . $_SESSION['user_id'] . ")"; $result = mysql_query($sql); if(!$result) { echo 'Your reply has not been saved, please try again later.'; } else { echo 'Your reply has been saved, check out <a href="topic.php?id=' . htmlentities($_GET['id']) . '">the topic</a>.'; } }}include 'footer.php';?> |

No comments:
Post a Comment