micromax canvas hd lollipop update
I rewrite this tutorial from forum.xda-developers.com : The users of Micromax A116 Canvas Hd can now update their handsets to Android 5.0 Lo...
The Blog You Will Love To Revisit.


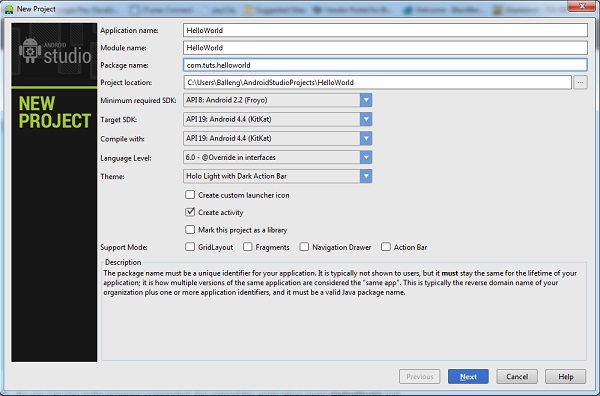
Activity class and a custom launch icon for you, and whether the project supports GridLayout, Fragments, a Navigation Drawer, or an Action Bar.Activity class Android Studio will create for you.
Activity class, you can click Next to proceed to the next step in the setup process in which you're asked to name the Activity class, the main layout, and the fragment layout. You can also set the navigation type, which we'll leave at None for this project. Take a look at the next screenshot to see what your settings should look like.


XML layout file and select the Text tab at the bottom of the workspace. Select the Preview tab on the right of the workspace to preview the current layout. Any changes you make to the XML layout will be reflected in the preview on the right. Take a look at the screenshot below to get a better idea of this neat feature.
XML layout you're currently working on by selecting an option from the first menu in the Preview pane. You can, for example, create separate views for portrait and landscape and Android Studio will create the necessary folders and files for you.Activity or fragment in which the layout is used. The Preview pane also lets you change the language used in the live layout to make it easy to preview a layout in different languages. The rightmost menu lets you change the API version.Activity and the necessary XML files. You can use these templates to create a basic Android application, which you can then run on a device or in the emulator.Activity. Right-click on the package name in the project navigator on the left, select New from the menu, and choose Activity from the list of options. Android Studio then shows you a list of templates, such as Blank Activity, Fullscreen Activity, and Tabbed Activity.
Activitybased on the Login Activity template. Select the Login Activity option from the list ofActivity templates to fire up the wizard.
Activity LoginActivity, set the Layout Name to activity_login, given the Activity a title of Sign In. The checkbox labeled Include Google+ sign in is checked by default. Uncheck it since we won't be using this feature in our example.Activity. This will let you navigate back if you tap the device's back button. We will leave this field empty. After clicking Finish, Android Studio creates the necessary files and folders for you. If all went well, you should see a new Activity and Layout in your project.Activity in the manifest file so it's used as the main Activity when the application launches. As you can see in manifest file below, the LoginActivity class has its own activity node.
01
02
03
04
05
06
07
08
09
10
11
12
13
14
15
16
17
18
19
20
| <application android:allowBackup="true" android:icon="@drawable/ic_launcher" android:label="@string/app_name" android:theme="@style/AppTheme" > <activity android:name="com.tuts.HelloWorld.MainActivity" android:label="@string/app_name" > <intent-filter> <action android:name="android.intent.action.MAIN" /> <category android:name="android.intent.category.LAUNCHER" /> </intent-filter> </activity> <activity android:name="com.tuts.HelloWorld.LoginActivity" android:label="@string/title_activity_login" android:windowSoftInputMode="adjustResize|stateVisible" > </activity> </application> |
LoginActivity you created, remove the activity node for the LoginActivity class and replace com.tuts.HelloWorld.MainActivitycom.tuts.HelloWorld.LoginActivity. The result is that the application will now use the LoginActivity class as its main Activity.
01
02
03
04
05
06
07
08
09
10
11
12
13
14
15
| <application android:allowBackup="true" android:icon="@drawable/ic_launcher" android:label="@string/app_name" android:theme="@style/AppTheme" > <activity android:name="za.co.helloworld.LoginActivity" android:label="@string/app_name" > <intent-filter> <action android:name="android.intent.action.MAIN" /> <category android:name="android.intent.category.LAUNCHER" /> </intent-filter> </activity> </application> |
Activity class with the newly created LoginActivity class.
LinearLayout in this layout is of no use. The nice thing about Android Lint is that it gives you a reason for the warning or error, which makes it easier to fix or resolve.

layout folder in your project's res folder, right-click the layout folder, and select New > Layout resource file from the menu that appears.

Get our latest updates direct in your inbox.Just enter your wail address below....
Your privacy and email address are safe with us!